Sunday, January 15, 2012

Skillet Corn Bread

This Saturday arrived cold and clear and beautiful. The forecasters have been screaming “SNOWMAGEDDON!!!” all week, so we figured if we were going to get snowed in, it was the perfect day for chili.  After breakfast, we threw together our favorite crock-pot chili recipe and set it to cook for the rest of the day.

What goes better with chili than cornbread? Not a lot. I’ve never made it from scratch before, so what better time to try than when I’ve got a blog post to write? None.  My dad just got me an awesome cast iron skillet for Christmas and I’ve yet to break it out, so I figured Skillet Corn Bread was in order.

I must be used to “Northern” corn bread, because the bread I turned out of the pan was less cakey and more savory than I’m used to in cornbread. Apparently those are characteristics of “Southern” corn bread. It was still tasty, though. Next time I’ll try and remember to save some bacon drippings or use butter – the vegetable oil did not impart any flavor to the bread at all. I will also use better cornmeal. The cornmeal really stars in this recipe and my bargain-brand, out of date meal was not very good at it’s role. The texture was really nice, though – soft and moist, but with a hearty grainy-ness.

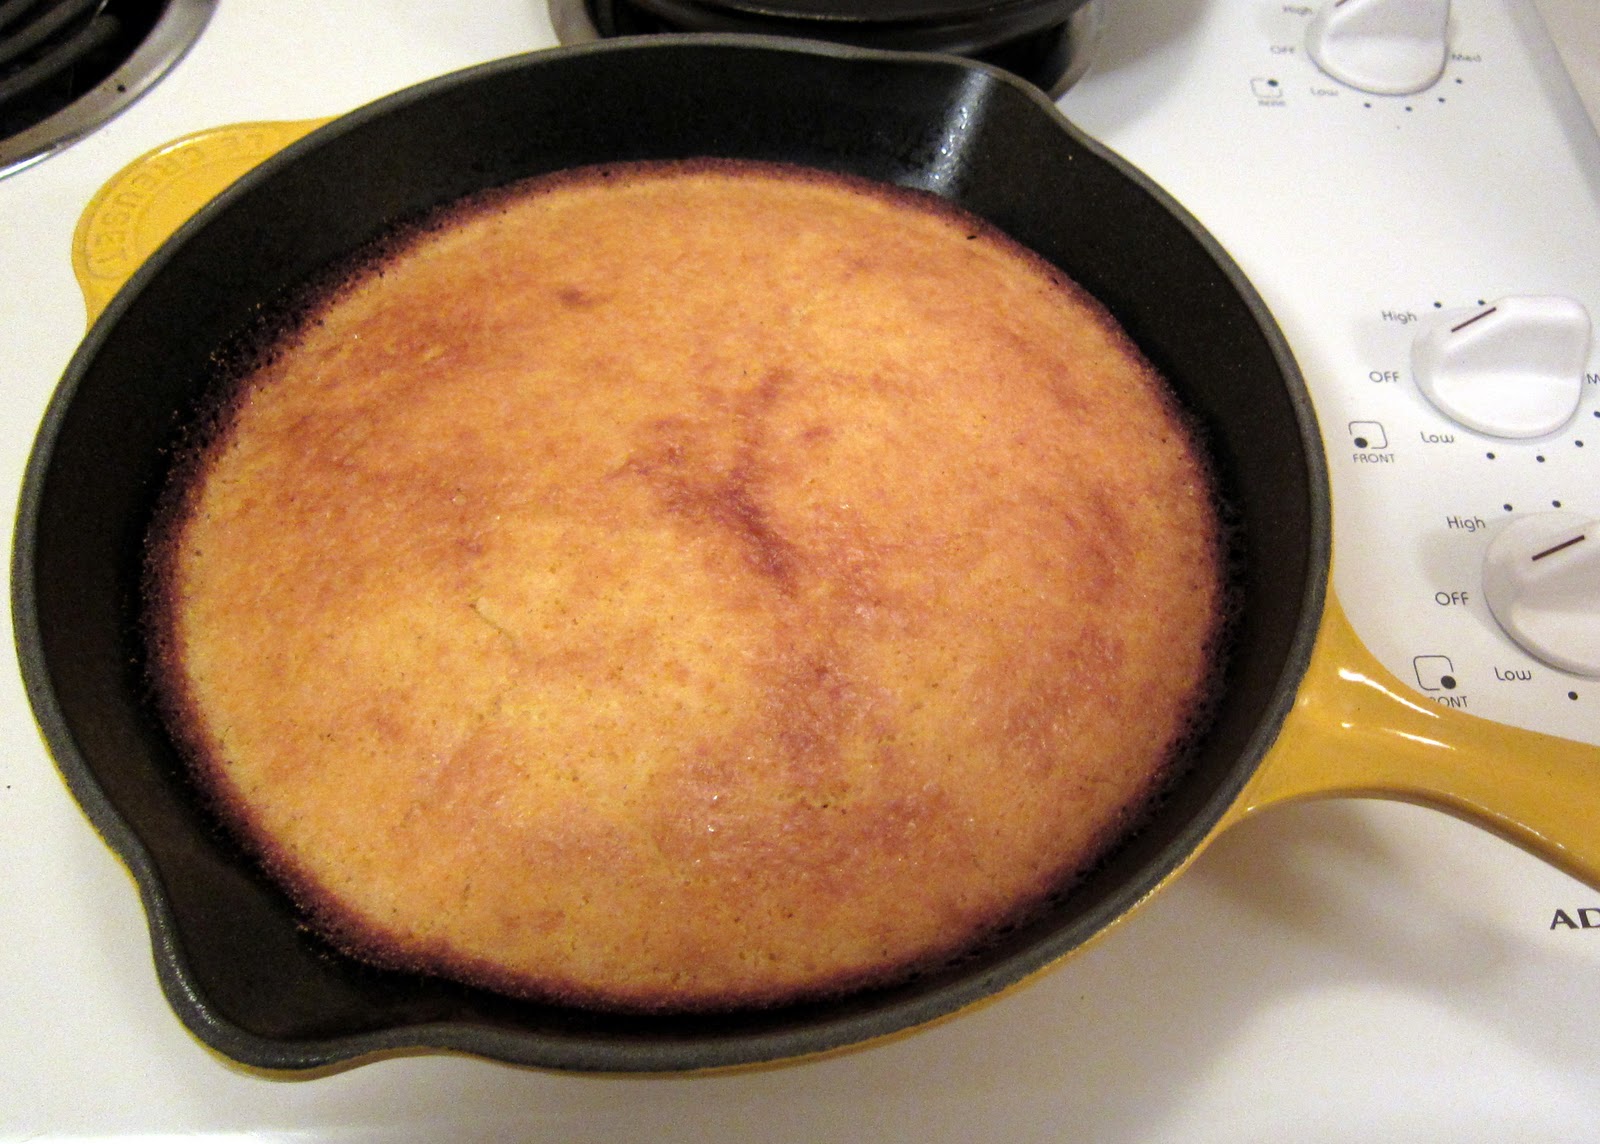


The snow didn’t arrive until today, but it was still a great night for chili!

Skillet Cornbread

Ingredients

4 t           bacon drippings or vegetable oil
1 c           fresh yellow cornmeal, preferably stone ground
2 t           granulated sugar
½ t          table salt
1 t           baking powder
¼ t          baking soda
1/3 c        water (rapidly boiling)
¾ c          buttermilk
1 lg          egg , beaten lightly

Instructions

1. Adjust oven rack to lower middle position and heat oven to 450 degrees.  Set cast-iron skillet with bacon fat (or vegetable oil) in heating oven.
2. Measure 1/3 cup cornmeal into medium bowl.  Mix remaining cornmeal, sugar, salt, baking powder, and baking soda in small bowl; set aside.
3. Pour boiling water all at once into the 1/3 cup cornmeal; stir to make a stiff mush. Whisk in buttermilk gradually, breaking up lumps until smooth, then whisk in egg.
4. When oven is preheated and skillet very hot, stir dry ingredients into mush mixture until just moistened. Carefully remove skillet from oven. Pour hot bacon fat (or vegetable oil) from the skillet into the batter and stir to incorporate, then quickly pour batter into heated skillet. Bake until golden brown, about 20 minutes. Remove from oven and turn cornbread onto wire rack; cool for 5 minutes, then serve immediately.

Sunday, January 8, 2012

Mini Carrot Cupcakes

Happy New Year!  I’ve made it my goal to post one blog entry a week.  This means I’ll be doing a lot of baking.  My husband loves that idea.  Welcome to the first post of (hopefully 52) posts for 2012

I try bake goodies for everyone’s birthdays at work.  My boss’ birthday was last Tuesday and she requested carrot cupcakes.  I’d made carrot cake before, and I thought carrot cupcakes would be very rich with that recipe, so I decided to make them mini cupcakes instead.  I like this recipe because you can make the batter in the food processor after grating the carrots and not have to clean two appliances. 

The only mini liners I could dig up were Easter ones that were too small for my pan, so I ditched the liners and sprayed the heck out of the pan.  I found that if I sprayed too much, the cupcakes couldn’t get a grip on the edge of the pan when rising and looked funny after baking.  I think next time I will also process the carrots a little with the regular processor blade so the carrot bits are smaller in the batter.

These are pretty tasty on their own, but are even better topped with a dollop of my favorite fluffy cream cheese icing, recipe included below.

Food Processor Mini Carrot Cupcakes

Ingredients
12½ oz  unbleached all-purpose flour (2½ cups)
1¼ tsp   baking powder
1 tsp      baking soda
1¼ tsp   ground cinnamon
½ tsp     ground nutmeg
1/8 tsp   ground cloves
½ tsp     table salt
1 lb         medium carrots (6 to 7 carrots), peeled
10½ oz  granulated sugar (1½ cups)
3 ½ oz    packed light brown sugar (½ cup)
4              large eggs
1½ c       vegetable oil , safflower oil, or canola oil

Instructions
1.       Adjust oven rack to middle position; heat oven to 350 degrees. Spray a mini cupcake pan with nonstick cooking spray or line with paper cups.
2.       Whisk together flour, baking powder, baking soda, cinnamon, nutmeg, cloves, and salt in large bowl; set aside.
3.       In food processor fitted with large shredding disk, shred carrots (you should get about 3 cups); transfer carrots to bowl and set aside. Wipe out food processor and stick the metal blade in.  Process both sugars and the eggs until frothy and thoroughly combined, about 20 seconds. With machine running, add oil through feed tube in steady stream.  Process until mixture is light in color and well emulsified, about 20 seconds longer.  Scrape mixture into medium bowl.  Stir in carrots and dry ingredients until incorporated and no streaks of flour remain.  Portion about Two tablespoons of batter into each cup and bake until toothpick or skewer inserted into center of cake comes out clean, about 7-8 minutes, rotating pan halfway through baking time. Cool cups in pans for 5 minutes, then turn out onto a cooling rack and let cool completely before frosting.
Source: CooksIllustrated.com


Fluffy Cream Cheese Frosting

Ingredients
12 T        unsalted butter, softened
12 oz      confectioner’s sugar (3 cups)
12 oz      cream cheese, cut into 6 pieces, softened
1 tsp      vanilla extract
Dash      salt

Instructions
1.       With an electric mixer, beat butter and sugar on medium-high speed until fluffy, about 2 minutes.  Add cream cheese, one piece at a time, and beat until incorporated, about 30 seconds.  Beat in vanilla and salt.  Refrigerate until ready to use.

Source: CooksCountry.com

Sunday, June 5, 2011

Poker Chip Cookies - Part 2

To see the dough recipe for these cookies, click here.

To Make the Poker Chip Cookies
*For each color poker chip, I used 2/3 a recipe white dough and 1 recipe colored dough. Keep  the dough that is not in immediate use in the refrigerator.
1.       Roll about 3 oz of colored dough into a log approximately 6” long and 1” in diameter
2.       Roll about 3 oz white dough into a sheet about 6” by about 3” and wrap it lengthwise around the colored dough.
3.       Roll another 3 oz of colored dough into a sheet about 6” by about 3.25” and wrap it lengthwise around the log.
4.       Put the log into the refrigerator and repeat steps 1-3.  Place the resulting log in the fridge as well.
5.       Roll out the remainder of the colored and white dough into 6” by about 9” rectangles, as shown. 
6.       Cut each rectangle into 24 strips as shown.


7.       Make a new rectangle by alternating 6 colored and 6 white strips and wrap the resulting rectangle around one of the refrigerated logs. Repeat with other log.


8.       Carefully roll and stretch the resulting log to adhere all layers and until it is the desired diameter.  If desired, cut into manageable lengths, and wrap in plastic wrap.


9.       Place dough rolls in freezer, using a slit paper towel roll to keep the shape if desired, for at least one hour.

10.   To Bake the cookies:  Adjust oven racks to the upper-middle and lower-middle positions and heat the oven to 350⁰.  Line 2 rimmed baking sheets with parchment paper.  Using a chef’s knife, slice dough into ¼-inch thick rounds, rotating the dough so that it won’t become misshapen.  Place cookies 1 inch apart on baking sheets.


11.   Bake until cookies are slightly browned around the edges, about 15 minutes, rotating the baking sheets front to back and top to bottom halfway through baking.  Cool cookies on the baking sheet about 5 minutes; using a thin metal spatula, transfer cookies to a wire rack and cool to room temperature.


12.   Stack ‘em up and place your bets!  The original recipe says cooled cookies can be stored between sheets of parchment paper in an airtight container for up to 1 week, but I’ve got some extras that are still good three weeks later.

Monday, May 30, 2011

Poker Chip Cookies - Part 1

Every year, our neighborhood has a poker tournament to raise money for our summer block party.  About three years ago, I had the idea to make some cookies that looked like poker chips for the event.  I did a little brainstorming and designing, found a sugar cookie recipe online that looked like it would work and baked up three different colors of poker chips.  They looked like this:
So they were cute, but spread too much so they didn’t actually look like poker chips and worst of all they tasted terrible.  I learned two lessons: 1, never bake a ton of cookies with a recipe you’ve never actually baked up and 2, I needed some better food colors – part of why the cookies tasted off was the large quantity of food coloring in the dough.

This year, I found a better recipe – one I made at Christmas – and decided to try again.  I picked this recipe for its minimal ingredients, its versatility, and the fact that the spread of the dough during baking is almost undetectable.  I also decided to do a different flavor with each color chip this time.  Below are the recipes for the flavors I made, but you can try different varieties.  I made two recipes of the white dough and one recipe of each colored dough.

French Butter Cookies – Plain Dough (for the white dough) *

Ingredients
1              large egg
10 T        (1 ¼ sticks) unsalted butter, softened
 1/3 c      plus 1 T granulated sugar (2 ¾ oz)
¼ t          salt
1 t           vanilla extract
1 ½ c      unbleached all-purpose flour (7 ½ oz)


Instructions
1.       Place egg in small saucepan, cover with 1 inch water, and bring to a boil over high heat.  Turn heat to low, cover, and let sit 10 minutes.  Meanwhile, fill a small bowl with ice water.  Using a slotted spoon, transfer egg to ice water and let stand 5 minutes.  Crack the egg and peel off the shell.  Separate the yolk from the white; discard (or eat) white.  Press yolk through a fine mesh strainer into small bowl.
 

2.       In bowl of stand mixer fitted with the paddle attachment, beat butter, sugar, salt, and cooked egg yolk on medium speed until light and fluffy, about 4 minutes, scraping down sides of bowl and beater as needed.  Turn the mixer down to low, add vanilla, and mix until incorporated.  Stop mixer, add flour, and mix on low speed until just combined, about 30 seconds.  Using a rubber spatula, press dough into a cohesive mass.


French Butter Cookies – Vanilla Dough (for the blue dough)  Same as plain, but increase vanilla to 1 T and add blue gel food coloring with the vanilla.

French Butter Cookies – Mint Dough (for the green dough)  Same as plain, but add 1 T peppermint extract and green gel food coloring with the vanilla.

French Butter Cookies – Chocolate Hazelnut Dough (for the black dough)

Ingredients
1              large egg
10 T        (1 ¼ sticks) unsalted butter, softened
1/3 c      plus 1 T granulated sugar (2 ¾ oz)
¼ t          salt
1 t           vanilla extract
2 t           hazelnut extract
2-3          drops black gel food color (optional)
1 1/3 c   unbleached all-purpose flour (6 2/3 oz)
¼ c          Dutch-processed cocoa (1 oz)
1/3 c      finely ground toasted hazelnuts

Instructions
1.       Place egg in small saucepan, cover with 1 inch water, and bring to a boil over high heat.  Turn heat to low, cover, and let sit 10 minutes.  Meanwhile, fill a small bowl with ice water.  Using a slotted spoon, transfer egg to ice water and let stand 5 minutes.  Crack the egg and peel off the shell.  Separate the yolk from the white; discard (or eat) white.  Press yolk through a fine mesh strainer into small bowl.
2.       Whisk flour, cocoa, and hazelnuts together in a small bowl and set aside.  In the bowl of stand mixer fitted with the paddle attachment, beat butter, sugar, salt, and cooked egg yolk on medium speed until light and fluffy, about 4 minutes, scraping down sides of bowl and beater as needed.  Turn the mixer down to low, add vanilla and food coloring, and mix until incorporated.  Stop mixer, add flour mixture, and mix on low speed until just combined, about 30 seconds.  Using a rubber spatula, press dough into a cohesive mass.

For Assembly Instructions, Click Here

*Original Recipe Source: Cook’s Illustrated November 2008

Homemade Croutons

Last week, we tried out a yummy skillet mac & cheese recipe from America's Test Kitchen.  Everyone's favorite part of the recipe was the homemade croutons that were sprinkled on top of the dish.  I'm of the opinion that most everything tastes better with garlic, so I altered the recipe a tiny bit and came up with some of the best croutons ever.  Here's how:

Ingredients:
3          slices sandwich bread
2-3 T    unsalted butter
garlic powder
            salt & pepper

Directions:
1.      Remove crusts from bread and cut into ½-inch cubes.
2.      Melt butter in a large skillet over medium –high heat.
3.      Toss bread cubes in butter and season with garlic powder, salt, and pepper to taste.
      4.      Toast until lovely brown and fragrant.
      5.      Devour.

Strawberry Shortcakes

This Saturday, we went shopping and stopped by a very dangerous local kitchen shop.  While avoiding spending my entire paycheck, I did find one item I've been looking for: the ultimate angel food cake pan (according to America's Test Kitchen). It's a Chicago Metallic Pan with a removable bottom and feet on top so you don't have to stick it on a wine bottle to cool.

I was so excited I brought it straight home and set about making my first-ever angel food cake. I whipped and mixed and poured and popped it in the oven. I waited patiently for it to bake and then for it to cool, upside down, for two hours per the instructions. When I finally cut the cake out of the pan - disaster. In fear of over-mixing, I hadn't mixed well enough and a bunch of unmixed sugar and flour had coagulated and sunk to the bottom of the cake. I was left with a slightly soggy, eggy cake with hard sugary lumps on top. Oh well, it still tasted alright, it just looked terrible.

I'll share the recipe and method when I get it right, but for today, here's a foolproof summer recipe that I make several times a year (it's my dad's favorite), as requested by my sister-in-law:


Strawberry Shortcakes
Fruit
2              quarts strawberries, hulled
6 T          sugar

Shortcakes
2 c           all-purpose flour, plus extra for the counter
5 T          sugar, divided
1 T          baking powder
½ t          salt
8 T          (1 stick) unsalted butter, cut into ½-inch cubes and chilled
2/3 c      half-and-half
1 lg         egg, lightly beaten
1 lg         egg white, lightly beaten

Whipped Cream
1 c           heavy cream, chilled
1 T          sugar
1 T          amaretto or vanilla extract

1.       Make the Fruit: Crush 3 cups of the strawberries with a potato masher.  Slice the remaining 5 cups of berries and stir into the crushed berries along with the sugar.  Let sit at room temperature until the sugar has dissolved and the berries are juicy, about 30 minutes.

2.       Make the Shortcakes: While the berries are macerating, adjust an oven rack to the lower-middle position and heat the oven to 425⁰.  Pulse together the flour, 3 tablespoons of the sugar, the baking powder, and the salt in a food processor until combined.  Scatter the butter pieces over the top and process until the mixer resembles coarse cornmeal, about 15 pulses.  Transfer to a bowl.

3.       Blend the half-and-half with the beaten egg and pour into the bowl with the flour mixture.  Stir with a rubber spatula until large clumps form.  Turn the mixture onto a lightly floured counter and knead lightly until the dough comes together.

4.       Use your fingertips to pat the dough into a 9 by 6-inch rectangle about 1 inch thick.  Cut out 6 dough rounds using a floured 2 ¾ -inch biscuit cutter. Reform the remaining dough and cut 2 more rounds.  Place the rounds 1 inch apart on a parchment-lined baking sheet, brush the tops with the beaten egg white, and sprinkle with the remaining 2 tablespoons sugar.

5.       Bake the shortcakes until golden brown, 12 to 14 minutes.  Let the shortcakes cool on the baking sheet for at least 10 minutes.

6.       Make the Whipped Cream: Meanwhile, mix the cream, sugar, and amaretto or vanilla in a chilled bowl with an electric mixer on low speed until frothy and the sugar has dissolved, about 1 minute.  Increase the speed to high and continue to whip until doubled in volume and soft peaks form, about 1 to 3 minutes.

7.       Assemble the Cakes:  Split each biscuit in half, laying the biscuit bottoms on individual plates.  Spoon a portion of the fruit over each bottom, then top with a dollop of whipped cream.  Cap with the biscuit tops and dig in!


Source: America's Test Kitchen Family Baking Book

Friday, May 13, 2011

Put the Lime in the Coconut...Cake!

My dad hosted Easter dinner this year and, as usual, asked me to make dessert. I wanted to come up with something new. My mother in law sent me a great set of tropical extracts for my birthday which included coconut extract. Steve and I brainstormed different pairings with coconut and came up with this recipe, adapted from a couple Cook's Illustrated recipes:


Lime in the Coconut Cake

Lime Curd Filling
1 c          fresh lime juice
1 tsp      unflavored gelatin
1 ½ c      (10 ½ oz) sugar
1/8 tsp     salt
6 lg         egg yolks
4 lg         eggs
8 T          (1 stick) unsalted butter, cut into ½-inch cubes and frozen
2 drops   blue gel food color (if desired)

Cake
¾ c          cream of coconut
5 lg         egg whites, room temperature
¼ c          water
1 lg         egg, room temperature
1 tsp       coconut extract
1 tsp       vanilla
2 ¼ c      (9 oz) cake flour
1 c          (7 oz) granulated sugar
1 T          baking powder
¾ tsp      salt
12 T        (1 ½ sticks) unsalted butter, cut into 12 pieces and softened

Buttercream
2 T          heavy cream
1 t           coconut extract
1 t           vanilla extract
Pinch      salt
16 T        (2 sticks) unsalted butter, cut into chunks and softened
¼ c          cream of coconut
3 c          (12 oz) confectioners’ sugar
2 c          (8 oz) sweetened shredded coconut

1.   Make the Lime Curd: Measure 1 tablespoon of the lime juice into a small bowl and sprinkle the gelatin over the top.  Cook the remaining lime juice, sugar, and salt together in a medium saucepan over medium-high heat, stirring occasionally, until the sugar dissolves and the mixture is hot (do not boil), about 1 minute.

2.   In a large bowl, whisk the egg yolks and eggs together until combined, then slowly whisk in the hot lemon mixture to temper.  Return the mixture to the saucepan and cook over medium-low heat, stirring constantly, until the mixture is thickened and a spatula scraped along the bottom of the pan leaves a trail (about 170 degrees on an instant-read thermometer), 4 to 6 minutes.

3.   Off the heat, stir in the gelatin mixture until dissolved.  Stir in the frozen butter until melted and incorporated.  Stir in gel food color until desired lime color is achieved.  Strain the curd into a medium bowl and press plastic wrap directly on the surface.  Refrigerate the curd until it is firm and spreadable, about 4 hours.

4.   Make the Cake:  Adjust an oven rack to the middle position and heat the oven to 325 degrees.  Grease and flour two 8-inch cake pans, then line the bottom with parchment rounds.  Whisk the cream of coconut, egg whites, water, egg, and extracts together in a medium bowl

5.   In a large bowl, whisk the flour, granulated sugar, baking powder, and salt together.  Using an electric mixer on medium-low speed, beat the butter into the flour mixture, one piece at a time, about 30 seconds.  Continue to beat the mixture until it resembles moist crumbs, 1 to 3 minutes.

6.   Beat in all but ½ cup of the cream of coconut mixture, then increase the mixer speed to medium and beat the batter until smooth, light, and fluffy, 1 to 3 minutes.  Reduce the mixer speed to low and slowly beat in the remaining cream of coconut mixture until the batter is combined, about 30 seconds.

7.   Scrape the batter into the prepared pans, smooth the tops, and gently tap the pans on the counter to settle the batter.  Bake the cakes until a toothpick inserted in the center comes out with a few crumbs attached, 30 to 35 minutes, rotating the pans halfway through baking.  Do not turn off the oven.

8.   Let the cakes cool in the pan for 10 minutes.  Run a small knife around the edge of the cakes, then flip them out onto a wire rack.  Peel off the parchment paper, flip the cakes right side up, and let cool completely before filling and frosting, about 2 hours.

9.   While cakes are cooling, spread shredded coconut on rimmed baking sheet; toast in the oven until shreds are a mix of golden brown and white, about 15 to 20 minutes, stirring 2 or 3 times. Cool to room temperature.

10. Assemble:  Line the edges of a cake platter with strips of parchment paper to keep the platter clean.  Level and slice each cake into two even layers using a long, serrated knife or a wire cake cutter.  Place the bottom layer carefully on the platter.  Spread 1 cup of the lime filling over the top, leaving a ½-inch border at the edge.  Repeat with two more cake layers and the remaining two cups of filling.  Place the final layer on top and press lightly to adhere.  Smooth out any filling that has leaked out of the sides.  Cover the cake with plastic wrap and refrigerate while making the buttercream.

11. For the Buttercream:  In a small bowl, stir the cream, extracts, and salt together.  In a large bowl, beat the butter and cream of coconut together with an electric mixer at medium-high speed until smooth, about 20 seconds.  Reduce the mixer speed to medium-low and gradually beat in the confectioners’ sugar, then continue to beat until smooth, 2 to 5 minutes.  Beat in the cream mixture.  Increase the mixer speed to medium-high and beat until the mixture is light and fluffy, 4 to 8 minutes.  Ice the cake, then sprinkle the top of the cake with the toasted coconut. Then press teh coconut into the sides, letting the excess fall back onto the platter. Clean up the coconut and then pull the parchment out before serving.